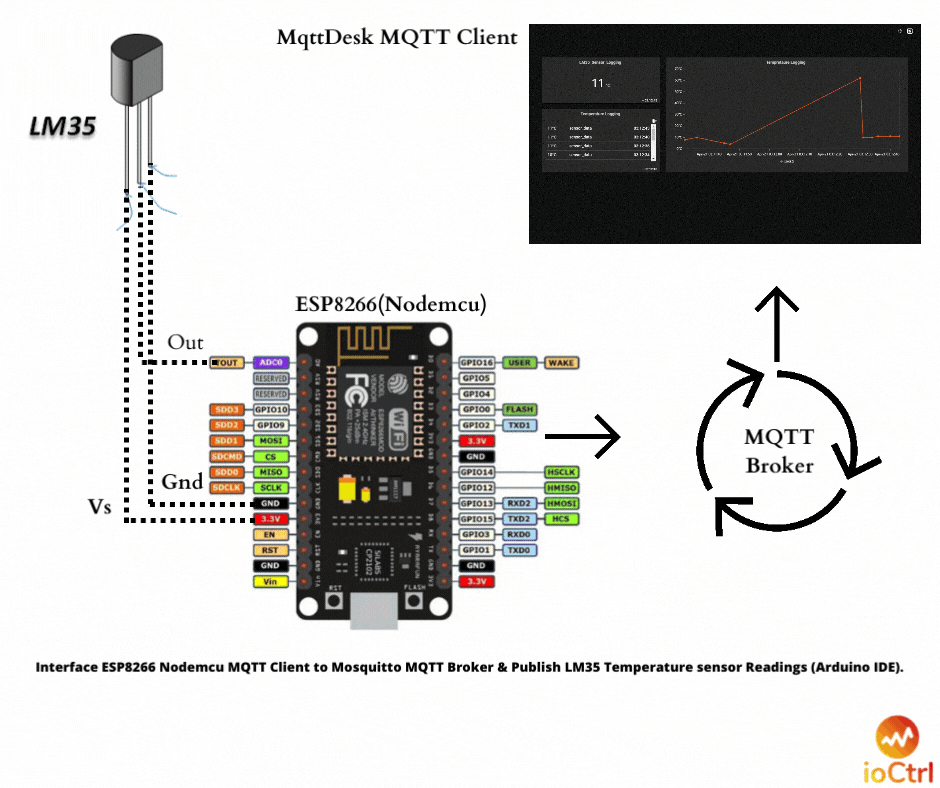
Getting started with MqttDesk MQTT Client, Mosquitto MQTT Broker, ESP8266 , LM35 Temperature sensor & Arduino for real time temperature monitoring Dashboard. This is the best example for IoT(Internet of things) Projects , where a LM35 Temperature Data Logger setup for Internet of things applications using ESP8266, LM35, MQTT , Mosquitto & Arduino IDE.
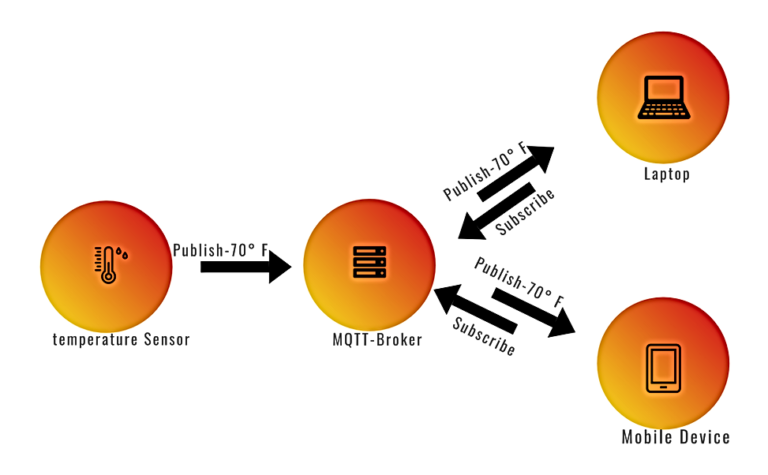
An example of LM35 Temperature Sensor connected on ESP8266(Nodemcu) Wi-Fi module and configured through Arduino IDE for Publishing Temperature sensor reading on Mosquitto MQTT Broker and then Mosquitto publishes the temperature to MqttDesk MQTT Client or other MQTT Client.
Things used in the IoT project..
1. MQTT Client
2.LM35 Sensor
3.ESP8266(Nodemcu)
4.Mosquitto
5.Arduino IDE
1.MqttDesk MQTT Client
MqttDesk is an MQTT Client for real time IoT Dashboard for Internet of things(IoT) projects.How to set up a dashboard & MQTT Client on MqttDesk , just visit the link where we have shown the setup & configuration examples. We will be using value widget and Charts to show the LM35 readings.Through the Arduino IDE we will be Publishing LM35 temperature readings to MqttDesk MQTT Client & mosquitto mqtt broker. MqttDesk MQTT Client is a part of MQTT Protocol Architecture.
2.LM35 Temperature Sensor
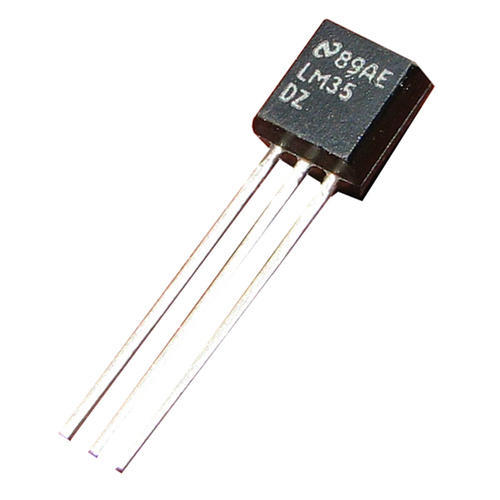
LM35 is the analog sensor to measure the temperature. It’s a temperature sensor with Vcc/GND/OUT pins connected to an ESP8266 board.
LM35 is better than a thermistor. Its output voltage is proportional at 10.0mv/°C to Celsius temperature as measured. It doesn’t require any calibration and provides an accuracy of +-1/4°C.
Here, we are using LM35 DZ which is available in TO-92 Plastic transistor Package. Measures in the range of 0°C to 100°C. LM35 will be connected to the ADC pin of the ESP8266 module which converts Analog to Digital signals. Check the LM35 Datasheet for exact model no. with exact specifications.
Check the pins on the LM35 sensor in the image below.
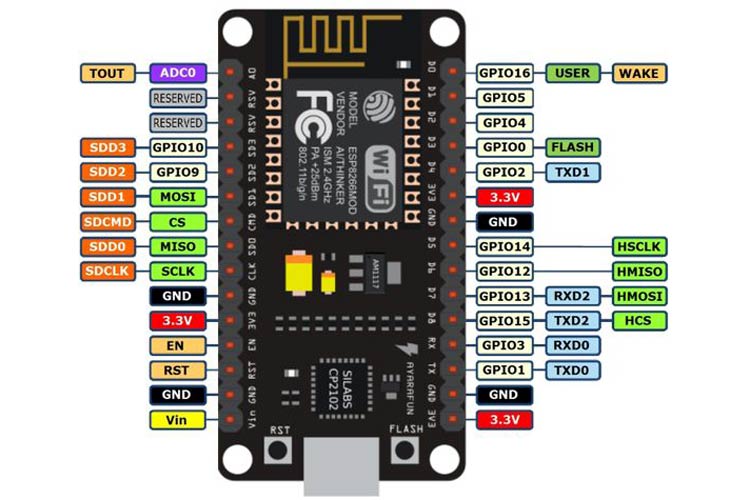
3.ESP8266/Nodemcu
ESP8266 is a small and intelligent microcontroller with Wi-Fi capabilities that is used in many Internet of things(IoT) & other home automation applications produced by Espressif Systems. Set up the ESP8266 Wi-Fi module on Arduino IDE and then write a few lines of code to publish the LM35 Sensor reading to MqttDesk MQTT Client through Mosquitto.
LM35 Connected to ESP8266 Wi-Fi module’s ADC pin. Check the below image of ESP8266 Pinout for connections. The OUT pin of LM35 connects to A0 pin of ESP8266(Nodemcu) and GND & Vs of LM35 connects to respective pins of ESP8266 Board.
4.Mosquitto MQTT Broker
Mosquitto is an open source MQTT Broker used in the MQTT Protocol publish/subscribe model. Its updated version works on MQTT v5.0. An instance of Mosquitto broker runs in a few minutes of configurations and is used as a messaging protocol for MQTT Clients.
Either an own instance can be used for this project or Mosquitto has a public broker for free to use.
5.Arduino software IDE
Arduino software IDE is an open source IDE used to write and upload the code to many microcontrollers available in the market like Arduino and Espressif Controllers.
Set up the Arduino IDE for ESP8266 Wi-Fi module to write and upload the code. Lot of libraries available for the ESP8266 WIFI module.
LM35 interfacing with Nodemcu ESP8266 WIFI Module, MqttDesk MQTT Client & Mosquitto
Lets setup the LM35 temperature sensor with ESP8266(Nodemcu).
- Connect the LM35 sensor pins to ESP8266(Nodemcu) microcontroller.
- Arduino Software IDE setup for ESP8266(Nodemcu) microcontroller.
- Use the code given to upload to ESP8266(Nodemcu).
- Download MqttDesk MQTT Client on your PC & Set up MQTT Client.
- Get the Mosquitto broker credentials to setup MQTT Client.
1.Connect LM35 Sensor with the ESP8266(Nodemcu)
- Connect LM35 GND to ESP8266(Nodemcu) GND Pin.
- Connect Vout Pin of LM35 to ADC(A0) Pin of ESP8266.
- Connect Vs to 3.3v of ESP8266.

2.Arduino Software IDE setup for ESP8266(Nodemcu) microcontroller
- Set up ESP8266 source if you are working on Arduino IDE 1st time with ESP8266 wifi module.
- Select the microcontroller(ESP8266 Nodemcu) & Com port for communication between IDE & Board.
- Copy the code and upload to ESP8266 board.
- Open serial monitor & check the MQTT Topic Publishing the Temperature data to MQTT Broker.
3.Use the code given to upload to ESP8266(Nodemcu)
#include
#include
const char* ssid = “Your wifi”;
const char* password = “password”;
const char* mqtt_server = “broker.emqx.io”;// Your server IP address
const char* mqtt_user = “ioctrl”;
const char* mqtt_password = “1234”;
WiFiClient espClient;
PubSubClient client(espClient);
long lastMsg = 0;
char msg[50];
int value = 0;
void setup() {
pinMode(LED_BUILTIN, OUTPUT); // Initialize the BUILTIN_LED pin as an output
Serial.begin(115200);
setup_wifi();
client.setServer(mqtt_server, 1883);
client.setCallback(callback);
}
void setup_wifi() {
delay(10);
Serial.println();
Serial.print(“Connecting to “);
Serial.println(ssid);
WiFi.begin(ssid, password);
while (WiFi.status() != WL_CONNECTED) {
delay(500);
Serial.print(“.”);
}
Serial.println(“”);
Serial.println(“WiFi connected”);
Serial.println(“IP address: “);
Serial.println(WiFi.localIP());
}
void callback(char* topic, byte* payload, unsigned int length) {
Serial.print(“Message arrived [“);
Serial.print(topic);
Serial.print(“] “);
for (int i = 0; i < length; i++) {
Serial.print((char)payload[i]);
}
Serial.println();
if ((char)payload[0] == ‘1’) {
digitalWrite(BUILTIN_LED, LOW);
} else {
digitalWrite(BUILTIN_LED, HIGH);
}
}
void reconnect() {
// Loop until we’re reconnected
while (!client.connected()) {
Serial.print(“Attempting MQTT connection…”);
if (client.connect(“ESP8266Client”, mqtt_user , mqtt_password)) {
Serial.println(“connected”);
client.subscribe(“led_topic”);
} else {
Serial.print(“failed, rc=”);
Serial.print(client.state());
Serial.println(” try again in 5 seconds”);
delay(5000);
}
}
}
void loop() {
if (!client.connected()) {
reconnect();
}
client.loop();
long now = millis();
if (now – lastMsg > 2000) {
lastMsg = now;
value=analogRead(A0);
snprintf (msg, 1000, “%ld”, value/10);
Serial.print(“Publish message: “);
Serial.println(msg);
client.publish(“sensor_data”, msg);
}
}
- Open the serial monitor and check your wifi connections with ESP8266.
- Check the broker connection and ESP8266 connection with MQTT Broker.
- Check the message publishing to MQTT Broker is correct on specified Topic.
4.Download MqttDesk MQTT Client on your PC & Set up MQTT Client.
MqttDesk MQTT Client is a cross platform MQTT Client for Internet of things(IoT) & Industrial IoT(IIoT) applications. Its a low cost & No code application for Freelancers & Enterprises for different applications like home automation, smart city, Industrial PLC & other type of industrial equipment monitoring. MqttDesk is available to download on Linux/macOS/Windows/SnapLinux/RaspberryPi on ARM32/ARM64 Microcontrollers.More than 25 widgets are available to use on ‘n’ nos. of dashboards for ‘n’ nos. of MQTT Clients.
- Visit www.ioctrl.com and download the MqttDesk MQTT Client for your machine like Linux/macOS/Windows/Snap.
- Open the MqttDesk MQTT Client app on Windows as used in our video.
- Create the MQTT Client with MQTT Broker details, add dashboard & add widgets & add the topic for sensor data visualization in real-time with MqttDesk MQTT Client.
- Use the link to learn how to create or add MQTT Broker & widgets in MqttDesk MQTT Client?
5.Get the Mosquitto broker credentials to setup MQTT Client.
Mosquitto is a open source and open MQTT Broker hosted for public at “test.mosquitto.org” Anyone can use the hosted broker for their applications. Use the below configurations in MqttDesk MQTT Client app to create an MQTT Client setup for Dashboard and widgets.
MQTT Broker- test.mosquitto.org
Port – 1883
Protocol – TCP
Now you can visualize the LM35 Temperature sensor data logging or visualize on MqttDesk MQTT Client with Mosquitto Broker with the help of ESP8266 Wifi module as MQTT Client Publishes the LM35 sensor data to Mosquitto Broker/Server and then Mosquitto publishes it to MqttDesk MQTT Client. Check the video for the project.